Pervasive Computing in Practice
Tutorial
Quick Start: Writing a Basic Light Follow Me
In this introduction we will create a basic light follow me with iCASA.
This tutorial assumes that you have basic knowledge on OSGi, Felix and iPOJO. You can read the getting started section for an introduction to these topics.
What is a Follow Me?
A Follow Me is a context-aware application that adapts its behaviour to the movement of a person to trigger a particular action (switch on/off the light, switch on/off a speaker…). Here the goal is to make the light follow the users.

This project uses the iCASA simulated binary lights.
Step-by-step Basic Light Follow Me
Installation and configuration
First install and set-up your environment.
Then copy the iCASA runtime into an accessible directory. In this tutorial, we assume that you will use ~/workspaces/runtimes/iCASA.
You will need to configure the IDE to work with that particular distribution (see how to install and configure iCASA IDE)
Project creation and skeleton generation
Open the iCASA-IDE.
This application will contain an unique class. To generate the skeleton of the class follow these steps:
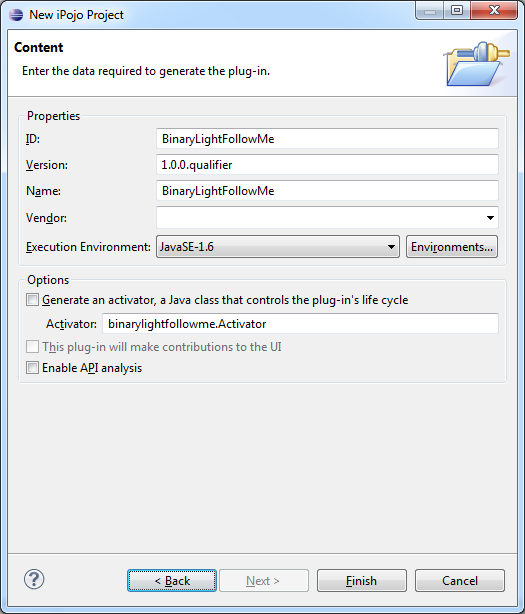
- Create a new iPOJO project called BinaryLightFollowMe. You don’t have to modify the bundle configuration as shown below:

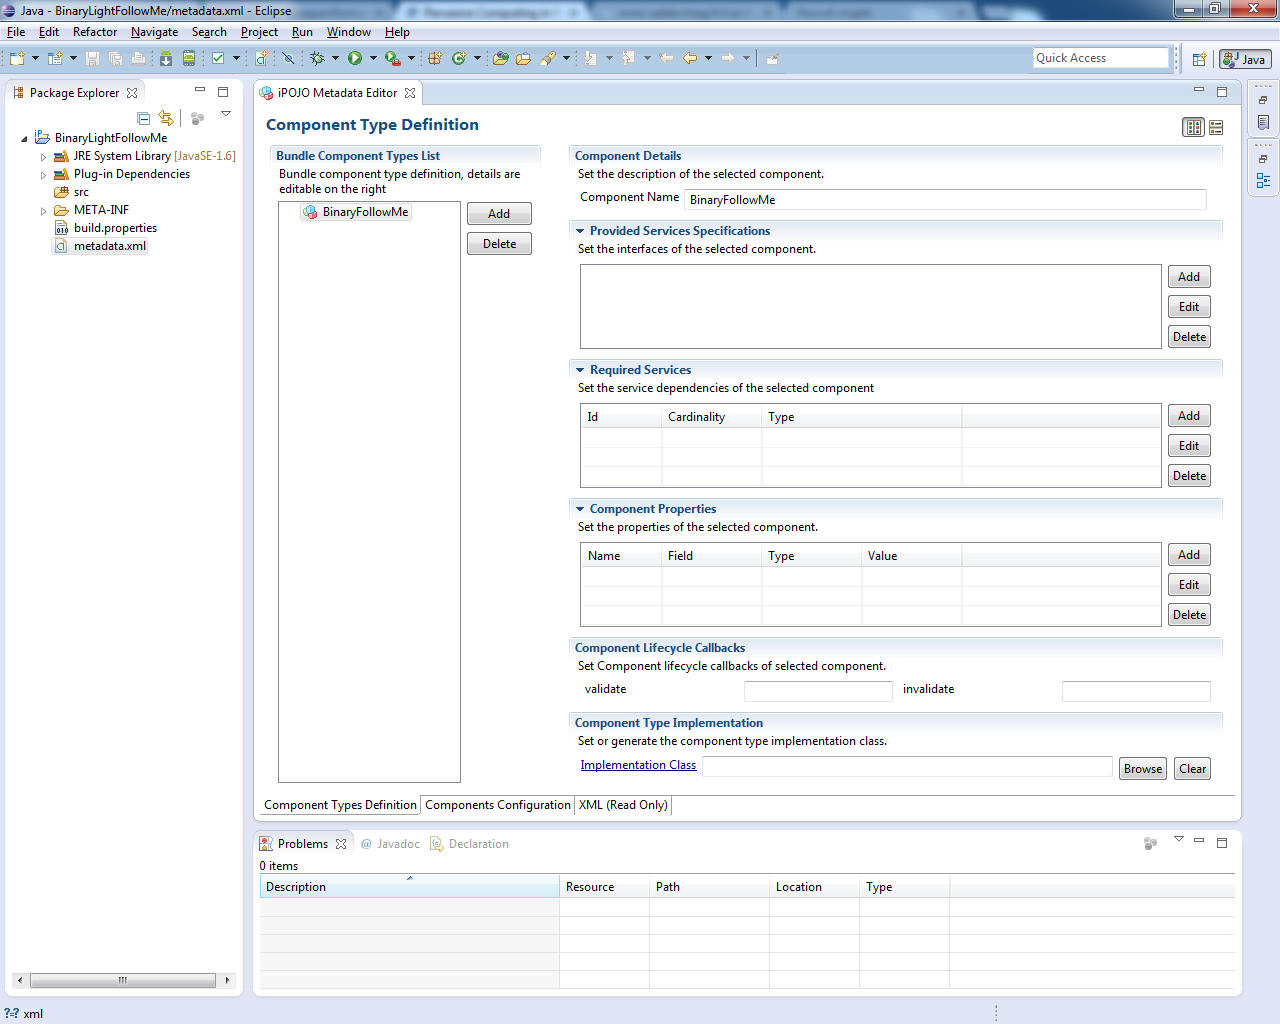
- Open the metadata.xml file with the iPOJO Metadata Editor. The IDE is described in details in the background section. See for instance the hello world example
- Create a new component BinaryFollowMe. Open the metadata.xml file with the iPOJO Metadata Editor. To do so, click add then rename the component.

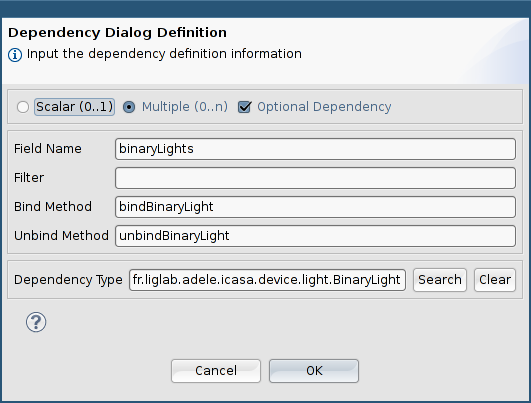
- Add to service dependencies (required services) multiple and optional (see iPOJO introductionand how to use services to learn more on dependencies):
- one dependency to BinaryLight, with a field
binaryLightsand (un)bindBinaryLight methods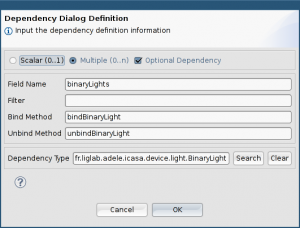
- one dependency to PresenceSensor with a field
presenceSensorsand (un)bindPresenceSensor methods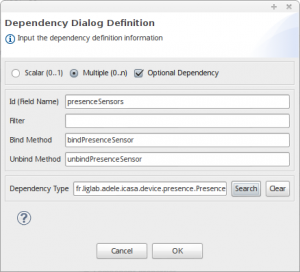
- one dependency to BinaryLight, with a field
- Add to new methods start and validate.

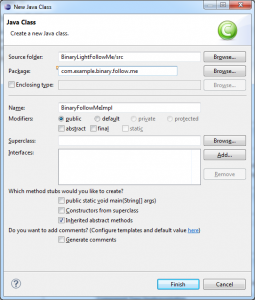
- Generate the class. Make sure you add a package. We will use the package follow.me.


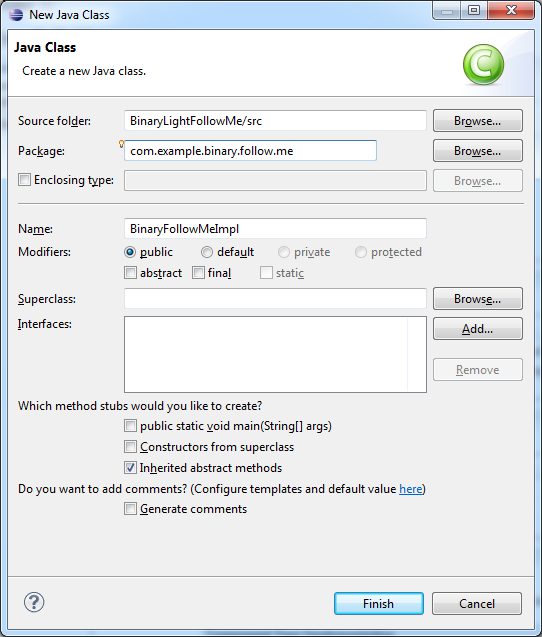
Hopefully you will have a skeleton like this:
package com.example.binary.follow.me;

import fr.liglab.adele.icasa.device.light.BinaryLight;
import fr.liglab.adele.icasa.device.presence.PresenceSensor;
import java.util.Map;

public class BinaryLightFollowMeImpl {

  /** Field for binaryLights dependency */
  private BinaryLight[] binaryLights;

  /** Field for presenceSensors dependency */
  private PresenceSensor[] presenceSensors;

  /** Bind Method for null dependency */
  public void bindBinaryLight(BinaryLight binaryLight, Map properties) {
     // TODO: Add your implementation code here
  }

  /** Unbind Method for null dependency */
  public void unbindBinaryLight(BinaryLight binaryLight, Map properties) {
     // TODO: Add your implementation code here
  }

  /** Bind Method for null dependency */
  public void bindPresenceSensor(PresenceSensor presenceSensor, Map properties) {
     // TODO: Add your implementation code here
  }

  /** Unbind Method for null dependency */
  public void unbindPresenceSensor(PresenceSensor presenceSensor,
    Map properties) {
     // TODO: Add your implementation code here
  }

  /** Component Lifecycle Method */
  public void stop() {
     // TODO: Add your implementation code here
  }

  /** Component Lifecycle Method */
  public void start() {
     // TODO: Add your implementation code here
  }
}
Managing the lists of devices
To ease the debug we will add a message when binding or unbinding devices.
/**
 * Bind Method for binaryLights dependency.
 * This method is not mandatory and implemented for debug purpose only.
 */
public void bindBinaryLight(BinaryLight binaryLight, Map<Object, Object> properties) {
  System.out.println("bind binary light " + binaryLight.getSerialNumber());
}

/**
 * Unbind Method for binaryLights dependency.
 * This method is not mandatory and implemented for debug purpose only.
 */
public void unbindBinaryLight(BinaryLight binaryLight, Map<Object, Object> properties) {
  System.out.println("unbind binary light " + binaryLight.getSerialNumber());
}

/**
 * Bind Method for PresenceSensors dependency.
 * This method will be used to manage device listener.
 */
public void bindPresenceSensor(PresenceSensor presenceSensor, Map<Object, Object> properties) {
   System.out.println("bind presence sensor "+ presenceSensor.getSerialNumber());
}

/**
 * Unbind Method for PresenceSensors dependency.
 * This method will be used to manage device listener.
 */
public void unbindPresenceSensor(PresenceSensor presenceSensor, Map properties) {
   System.out.println("Unbind presence sensor "+ presenceSensor.getSerialNumber());
}
It should be stressed here that the dependencies arrays (binaryLights[] and presenceSensors[]) are dynamically injected by iPOJO. You don’t have to modify these arrays.
Lifecycle methods
We will use lifecycle methods to see when our component instance is started/stopped. See the hello world tutorial to learn more on lifecycle methods.
In order to check the good functioning of the component, we will print two traces in the lifecycle methods: start and stop.
/** Component Lifecycle Method */
public void stop() {
   System.out.println("Component is stopping...");
}

/** Component Lifecycle Method */
public void start() {
   System.out.println("Component is starting...");
}
Hopefully we will see these messages when starting and stopping the application.
Create an instance
Let’s create our first component instance.
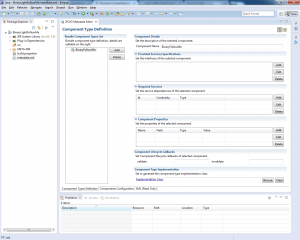
Go to “Component Configuration” and create an instance for your “Follow” components. You can change the name by default. Let’s call it “my.first.follow.me”
![]()
Now we can test that this very basic project is working
- Run iCASA.
- Right-click on project > iCASA> Bundle Deployment.

- Check that the bundle is correctly deployed (using lb).

g!lb
...
   61|Active     |    1|iCasa :: environment.api (0.0.1.SNAPSHOT)
   62|Active     |    1|Follow_Me (1.0.0.qualifier)
g!
- Start your component (using start) and stop it. You should see the message we put in the lifecycle methods.
If you don’t see the lifecycle messages, you must have done something wrong. Retry the preceding steps.
Now we can check the binding/unbinding methods :
- Put the single_bl_light_environment.bhv file in the load directory of your iCASA runtime.
- Start iCASA runtime and the simulator
- Go to http://localhost:9000/simulator
- Select the default house.
- Click on “Scenarios and Scripts” then “install” in “iCASA Scenarios”.
- Check that the application has seen the light. It should start writing message in the console.
If the applications prints no message when adding the devices, check your code again.
Manage notifications and detect modifications
We will try to be notified when something is modified.
The DeviceListener interface
Let’s start with the sensors.
In order to be notified when something is modified in the environment, we must implement a DeviceListener.
DeviceListener: The DeviceListener interface allows to get a notification when a device changes.
There are four ways to implement it.
First, you can make the main class (BinaryLightFollowMeImpl) implement the interface:
public class BinaryLightFollowMeImpl implements DeviceListener{ //..
This solution is suitable when your main class is small.
Second, you can define a new private inner class.
public class BinaryLightFollowMeImpl {
...
public class PresenceSensorListener implements DeviceListener{

    @Override
    public void devicePropertyModified(GenericDevice device, String propertyName, Object oldValue, Object newValue) {
        /...
    }
...
}
Third, you can use a anonymous class. This solution allows less control but ensures that there will be only one listener instance.
Finally, you can create a separate class but this class will need to have access to the device lists. It requires a little more code to work. This solution is suitable if your main class is big and you don’t want to add more code.
In the following we will use the first solution.
public class BinaryLightFollowMeImpl implements DeviceListener
To start, we can print something when a presence sensor detects something (presence or not):
/**
 * This method is part of the DeviceListener interface and is called when a
 * subscribed device property is modified.
 *
 * @param device
 *            is the device whose property has been modified.
 * @param propertyName
 *            is the name of the modified property.
 * @param oldValue
 *            is the old value of the property
 * @param newValue
 *            is the new value of the property
 */
public void devicePropertyModified(GenericDevice device,
    String propertyName, Object oldValue,Object newValue) {

  //we assume that we listen only to presence sensor events (otherwise there is a bug)
  assert device instanceof PresenceSensor : "device must be a presence sensors only";

  //based on that assumption we can cast the generic device without checking via instanceof
  PresenceSensor changingSensor = (PresenceSensor) device;

  // check the change is related to presence sensing
  if (propertyName.equals(PresenceSensor.PRESENCE_SENSOR_SENSED_PRESENCE)) {
    // get the location of the changing sensor:
    String detectorLocation = (String) changingSensor.getPropertyValue(LOCATION_PROPERTY_NAME);
    System.out.println("The device with the serial number"
                       + changingSensor.getSerialNumber()+" has changed");
    System.out.println("This sensor is in the room :" + detectorLocation);
  }

}
The PRESENCE_SENSOR_SENSED_PRESENCE property value changes every time the detection changes from detected to undetected and reciprocally.
Each device type has a different set of properties. The value of these properties can be set or retrieved by using a key string (e.g., “location”). This works exactly like service properties. This mechanism allows each type of device to define their own properties.
To avoid magic string, some of the properties are defined directly by the interface (e.g., PRESENCE_SENSOR_SENSED_PRESENCE is defined in the PresenceSensor interface). Some are not (e.g., location).
In the following, we define a constant LOCATION_PROPERTY_NAME for the “location” property (and a value for unknown location):
/**
 * The name of the LOCATION property
 */
public static final String LOCATION_PROPERTY_NAME = "Location";

/**
 * The name of the location for unknown value
 */
public static final String LOCATION_UNKNOWN = "unknown";
Registering the listener
We thus need to attach this new listener to the interesting devices (in our case all the presence sensors). This is done in the bind method of presence sensors:
/**
 * Bind Method for PresenceSensors dependency.
 * This method is used to manage device listener.
 */
public synchronized void bindPresenceSensor(PresenceSensor presenceSensor, Map properties) {
  // Add the listener to the presence sensor
  presenceSensor.addListener(this); //..
}
We can also unregister the listener when the sensor is leaving:
/**
 * Unbind Method for PresenceSensors dependency.
 * This method is used to manage device listener.
 */
public synchronized void unbindPresenceSensor(PresenceSensor presenceSensor, Map properties) {
  // Remove the listener from the presence sensor
  presenceSensor.removeListener(this); //..
}
You could think that in this particular case, this is not really mandatory. Indeed, the device is leaving and thus the listener will be unregistered anyway. However, it is a good practice to always unregister the listeners.
We also need to unregister the listener in the stop method, because our component is stopping but maybe not the whole platform (when you redeploy your app for exemple) :
  /** Component Lifecycle Method */
public synchronized void stop() {
   for(PresenceSensor sensor : presenceSensors){
      sensor.removeListener(this);
   }
}
Testing that we get the notifications
Now we can test that the notifications work:
- deploy the project;
- create a simulated user and then place it in a room using the select box;
- move the user in a room where there is a detector.
- If all is ok, you see a message like this one:
The device with the serial number SekuSensor-AAA-20119215-S has changed.
This sensor is in the room : kitchen
If this does not work, check that your listener is correctly registered and created. Also check that there is a presence sensor in the room.
Finding the lights in the same room
To be able to switch on or off the light, we need to find the light in the rooms where a presence has been detected.
To do so, we implement a search method:
/**
 * Return all BinaryLight from the given location
 *
 * @param location
 *            : the given location
 * @return the list of matching BinaryLights
 */
private synchronized List<BinaryLight> getBinaryLightFromLocation(
    String location) {
  List<BinaryLight> binaryLightsLocation = new ArrayList<BinaryLight>();
  for (BinaryLight binLight : binaryLights) {
    if (binLight.getPropertyValue(LOCATION_PROPERTY_NAME).equals(
        location)) {
      binaryLightsLocation.add(binLight);
    }
  }
  return binaryLightsLocation;
}
Modifying the state of lights
Finally we will test the state of the sensor (presence or not) and change the lights accordingly:
/**
 * This method is part of the DeviceListener interface and is called when a
 * subscribed device property is modified.
 *
 * @param device
 *            is the device whose property has been modified.
 * @param propertyName
 *            is the name of the modified property.
 * @param oldValue
 *            is the old value of the property
 * @param newValue
 *            is the new value of the property
 */
public void devicePropertyModified(GenericDevice device, String propertyName, Object oldValue, Object newValue) {
  PresenceSensor changingSensor = (PresenceSensor) device;
  // check the change is related to presence sensing
  if (propertyName.equals(PresenceSensor.PRESENCE_SENSOR_SENSED_PRESENCE)) {
    // get the location where the sensor is:
    String detectorLocation = (String) changingSensor.getPropertyValue(LOCATION_PROPERTY_NAME);
    // if the location is known :
    if (!detectorLocation.equals(LOCATION_UNKNOWN)) {
      // get the related binary lights
      List<BinaryLight> sameLocationLigths = getBinaryLightFromLocation(detectorLocation);
      for (BinaryLight binaryLight : sameLocationLigths) {
           // and switch them on/off depending on the sensed presence
           if(changingSensor.getSensedPresence()){
               binaryLight.turnOn();
           }else{
               binaryLight.turnOff();
           }
      }
    }
  }
}
Now you can test your application by moving the user. Hopefully, the lights will change as desired.
Play with it
Now you can play with your application and add new devices and see what happens when you move your user.
To add new sensors in the iCASA interface:
- Go to “Device List”
- Select the type PrecenseSensor in the list.
- Give it a unique name.
- Activate it in the list of devices.
- Move it to the desired room.
A word on concurrency
You may have noticed that the concurrency is apparently not managed in this short tutorial. It is indeed managed by iPOJO.
Since OSGi environment is multi-threaded, multiple threads may access the class at the same time. One common problem occurs when a thread tries to remove a device from a collection while another thread is using the collection or device elsewhere in the class.
This is the case here: the binaryLights array may be modified when searching for the light in getBinaryLightFromLocation methods called by devicePropertyModified. The array is dynamically modified by iPOJO when a service is changing (thread 1) and it is possible that a light is when handling a devicePropertyModified (thread 2).
Normally, we should use a lock when accessing or modifying the array to prevent concurrent access. However the collections managed by iPOJO are synchronized and the locking is managed by iPOJO.
iPOJO ensures that the list won’t be changed until the end of the method getBinaryLightFromLocation. It is therefore not necessary to synchronize in this tutorial.
BUT:
The synchronization is managed only for iPOJO fields: you will have to manage concurrency if you store the services or devices in different collection.