Pervasive Computing in Practice
Providing and using services
The previous section we have seen how to implement a multilingual “Hello World” using properties. In this section we will re-implement it using services. The purpose of this section is to introduce :
- how to provide services using iPOJO IDE.
- how to use services in a iPOJO component.
Create a new project
This project is different from the previous “Hello World”. We advise you to delete the content of the applications directory so to avoid interference. In this tutorial, we will use a single bundle to contains our service and components (in the next tutorial, you will learn how to dispatch the services in multiple bundles)
First, create an iPOJO project call “hello.using.service”.
We will give our bundle a different symbolic name from the previous one to avoid conflicts. Let’s name it : “Hello World Using Service”
The service specification
At the core of service interaction is the service specification. In OSGi, the service specification is made of an interface and several properties contained in a Dictionnary.
The Hello World interface
Before creating any new component, we will start by creating the service interface. This interface is one of the only class shared by providers and consumers of a service.
Create a new Hello.java interface into a new “org.example.hello.service” package :![]()
The Hello service is very simple and
package org.example.hello.service;

public interface Hello {
    void sayHello(String name);
}
The service properties
As we explained, in OSGi, the meta-information are provided using a Dictionary. The code below shows how a service is registered in pure OSGi (you won’t have to do that, it is managed by the iPOJO) :
Dictionary properties = new Hashtable();//...
properties.add("lang", "en"); // ...
registry.registerService(ServiceInterface.class.getName(), serviceObject, properties);
As you see, the registration is very flexible, you can add whatever property you want when registering the service. This properties can then be retrieved by the consumer :
//When searching in the registry using a filter :
ServiceReference myServiceReference = registry.getServiceReferences(ServiceInterface.class, "(lang=fr)");

//On a service to get its properties :
String lang = myServiceReference.getProperty("lang");
OSGi specifies no easy ways to enforce the content of the dictionary. This raises some maintainability problems : if you change the name of the property, you will have to change the name everywhere (consumers and providers). OSGi won’t throw an error if you try to read the get the property language instead of lang (you will get null).
Actually properties name are a common source of bug in OSGi when refactoring your code. So if you have always pay attention to that when debugging.
One way to partially avoid that problems is to put the name of the properties in the interface :
package org.example.hello.service;

public interface Hello {
    /**
    * The property lang defines the language used by the service.
    **/
    public static final String PROP_LANG = "lang";

    void sayHello(String name);
}
We suggest you to do that, this way, you can use the constant instead of the property name. Note that this is far from being magical and you will still have to pay attention to properties in the iPOJO metadata (and then in the metadata configuration in the IDE).
The service provider
Definition of the english provider component
We will start by creating our service provider. The service provider is a component that implement the service interface.![]()
In the “Provided Service” section click on add. This will let you choose the service interface. Select org.example.hello.service.Hello

We will add a new property “lang”. Right click on the newly added interface and select “add property”.
The “Property dialog” ask for :
- the name of the property : this name is the public name of the property registered in the registry. The property is retrieved by this name.
- the corresponding field in the implementation class. This is the field in which the property is injected at startup. This information is implementation dependent. It works exactly the same as the configuration property we have presented before. It is sometimes used to change the property of the service depending on the context. See the service property propagation section in the iPOJO documentation for more information.
- the default value is the value given to the property if you do not configure it in the instance configuration.
- the type is a java class defining the type of the property. iPOJO supports all primitive types or objects as property type but we advise you to stick with primitive types unless you know what you are doing.
Call your property “lang” with a default value “en” and String as a type. Leave the property field to blank, we won’t use it this time.
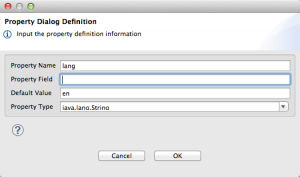
If successful the property will be listed as a service property under the interface name.
Also add a start and stop method (as seen on the first tutorial)
Implementation of the english provider
No you can generate the class. We will use org.example.hello.service.impl as package name. As we will discuss the next section, it is a good practice to always separate the implementation package from the service specification package. This way you can hide the implementation package from the providers and prevents non-standard use of your service.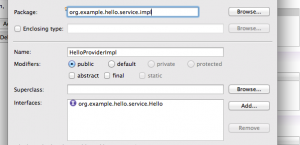
The generated class should look like that :
package org.example.hello.service.impl;

import org.example.hello.service.Hello;

public class HelloProviderImpl implements Hello {

    @Override
    public void sayHello(String name) {
        // TODO Auto-generated method stub

    }

    /** Component Lifecycle Method */
    public void stop() {
        // TODO: Add your implementation code here
    }

    /** Component Lifecycle Method */
    public void start() {
        // TODO: Add your implementation code here
    }

}
The implementation is quite simple. We will implement an english Hello World :
package org.example.hello.service.impl;

import org.example.hello.service.Hello;

public class HelloProviderImpl implements Hello {

    @Override
    public void sayHello(String name) {
        System.out.println("Hello "+name);
    }

    /** Component Lifecycle Method */
    public void stop() {
        System.out.println("The english hello service is stopping");
    }

    /** Component Lifecycle Method */
    public void start() {
        System.out.println("The english hello service is starting");
    }

}
The english provider instance
Create a new instance of your component and configure the property “lang” to “en”.
The client will use this property to discover the client.
The Hello Client
Configuration of the component
Now, we will implement a client of our english provider that will call it on a regular basis.
Create a new component called “HelloClient”.
This component will depend on the “Hello” service. To define the dependency, go to the “Required Service” panel and select add.
The dialog is a little more complex than for the provider. You have to determine :
- if the dependency is single or multiple : as we explained in the iPOJO introduction, a single dependency means that your component will be tied with only one service at once (at maximum), a multiple dependency implies that your component can be tied to multiple providers (potentially all). In our case, we will use two providers, so we will check the multiple checkbox.
- if the dependency is optional : when mandatory the cardinality is (1,1 – single) or (1,n – multiple). That means that your component can be stopped if no service is available. When the dependency is optional, the cardinality is (0,1 – single) or (0,n – multiple) and the component lifecycle is not affected by the availability of services.
- the name of the injected field. Services will be injected to this field depending on the policy (see iPOJO introduction). In our case, we will use the default policy : keeping the services until they are unavailable. We will called it “helloServices”. As the dependency is multiple and optional, the IDE will generate an array of size (0..n) that will be injected by iPOJO.
- the bind and unbind methods. These methods are called when a new service is discovered (reciprocally when it leaves).They offer a convenient way to react to service change and to get the service properties from a specific service. The signature of the method is (Object service, Map properties) where they object is the service and the map contains the properties. In our case, we only use these methods to prompt some message. Later we will see that we can use them for improving context-awareness.
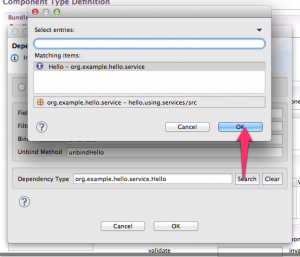
- the type is the name of the service interface. In our case, “org.example.hello.service.Hello”.
Configure the dependency type to “org.example.hello.service.Hello” by selecting the interface in the selection wizard.
Implementation of the Hello client
Let’s generate the client. Once again, you should use a different package name (org.example.hello.client)
 The skeleton looks like this :
package org.example.hello.client;

import org.example.hello.service.Hello;
import java.util.Map;

public class HelloClientImpl {

    /** Field for helloServices dependency */
    private Hello[] helloServices;

    /** Bind Method for null dependency */
    public void bindHello(Hello hello, Map properties) {
        // TODO: Add your implementation code here
    }

    /** Unbind Method for null dependency */
    public void unbindHello(Hello hello, Map properties) {
        // TODO: Add your implementation code here
    }

    /** Component Lifecycle Method */
    public void stop() {
        // TODO: Add your implementation code here
    }

    /** Component Lifecycle Method */
    public void start() {
        // TODO: Add your implementation code here
    }

}
The implementation of the client is a little trickier than the provider but if you are used to multi-threading it won’t be too complex for you. Note that we could also have used a ScheduledExcecutor.
What the code basically do is calling askProvidersToSayHello every second (1000 ms). Note that in a better implementation we could have use a configuration property to configure the delay.
The methods bindHello and unbindHello are just used to prompt a message everytime a matching service is found. In this basic implementation, they are not required by the client to work. You can try to remove them from the code and the component definition if you want (the client will still work).
The field helloServices is the most important part of the code. It is automatically updated by iPOJO each time a new service is found.
A little warning about concurrency
Using iPOJO will make the concurrency management easier. In most cases, you won’t have to deal with concurrency which is a good thing considering how error-prone it is. However the way iPOJO manages concurrency can be surprising at first and can be error-prone.
Basically, iPOJO ensures that the service you are using won’t change during a method call. That implies that :
- you won’t be able to see any new services while you don’t change methods. If you want to be notified of the arrival of new services, you will have to call a new method (as we do in method askProvidersToSayHello).
- a service cannot be unregistered from OSGi while you are processing something into your method.
The field helloServices is used by the method askProvidersToSayHello to call the services.
package org.example.hello.client;

import org.example.hello.service.Hello;
import java.util.Map;

public class HelloClientImpl implements Runnable {

    /** Field for helloServices dependency */
    private Hello[] helloServices;

    /** Bind Method for null dependency */
    public void bindHello(Hello hello, Map properties) {
        System.out.println("New Provider language = " + properties.get(Hello.PROP_LANG));
    }

    /** Unbind Method for null dependency */
    public void unbindHello(Hello hello, Map properties) {
        System.out.println("Provider leaving language = "
                + properties.get(Hello.PROP_LANG));
    }

    private void askProvidersToSayHello() {
        for (int i = 0; i < helloServices.length; i++) {
            helloServices[i].sayHello("client");
        }
    }

    /**
     * When m_end is false and the component is started, the component ask
     * providers to say hello on a regular basis. When m_end is true, the thread
     * is stopped
     */
    private boolean m_end = false;

    /** Component Lifecycle Method */
    public void start() {
        Thread t = new Thread(this);
        m_end = false;
        t.start();
    }

    /** Component Lifecycle Method */
    public void stop() {
        m_end = true;
    }

    @Override
    public void run() {
        try {
            while (!m_end) {
                askProvidersToSayHello();
                Thread.sleep(1000);
            }
        } catch (InterruptedException e) {
            stop();
        }
    }

}
Create the Hello Client instance
Create a new instance of the Hello client and call it “HelloClient”.
Test with one provider and one client
Now you can deploy and test you application. You should get something like this :
The english hello service is starting
New Provider language = en
Hello client
Hello client
Hello client
Hello client
...
The first message is printed by the english hello service. The next message is from the client : it has discover a new provider and can start running. Then, the client start calling the english Hello client every second.
Practice
You can try to create multiple client and services instances to see how the different components behave.
French provider
Now we will create a new french provider. The process is the same than the one you followed for the creation of the English provider.
Create your component (and add the lang property)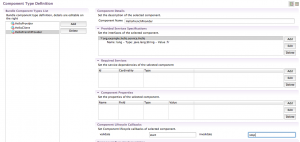
Then generate the class (HelloFrenchProviderImpl) and complete the code :
package org.example.hello.service.impl;

import org.example.hello.service.Hello;

public class HelloFrenchProviderImpl implements Hello {

    @Override
    public void sayHello(String name) {
        System.out.println("Bonjour "+name);
    }

    /** Component Lifecycle Method */
    public void stop() {
        System.out.println("The french hello service is stopping");
    }

    /** Component Lifecycle Method */
    public void start() {
        System.out.println("The french hello service is starting");
    }
}
Create a new instance with the property “lang” set to “fr”.
Test with the french provider
Now, if you redeploy the code, your client will use the two services :
The english hello service is starting
New Provider language = en
The french hello service is starting
New Provider language = fr
Hello client
Bonjour client
Hello client
Bonjour client
Hello client
Use the service filter
If for some reasons you want to use a service with specific properties, you can use an LDAP filter when expressing the dependency. See the ldap filter syntax to have a quick overview on how to write filters.
In our case, we will configure our client to use the French provider only.
Go to the Hello Client component definition and edit the “Hello” service dependency. Add a (lang=fr) filter as shown below :
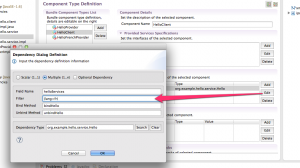 If you redeploy your code, you will see that the english component is started but not used by the Hello Client.
The english hello service is starting
The french hello service is starting
New Provider language = fr
Bonjour client
Bonjour client
Bonjour client
Bonjour client
Bonjour client
Practice
Try to create several different french provider and english provider to see it the filter is working. You can also add a new “location” property and use a filter to get a subset of providers only.
Conclusion
In this tutorial you have learn how to create and use services. In the next section, you will learn how to split your application into several bundles so as to benefits from the dynamism offered by services.
