Pervasive Computing in Practice
Building an application from multiple bundles
 In the previous tutorial, you have learned how to provide and use services. All the services were provided and used by the same bundle. This has several drawbacks as you can not provide new services without redeploying and restarting the bundle. In this tutorial, you will learn how to use the bundles to separate providers from client.
Decoupling
The main advantage of using multiple bundles is the capability of adding new classes and packages to the application. This possibility largely depends on how you divide the application. You should have two things in mind when creating bundles :
First, you have to define how many bundle you will use. If you split your application into two many blocks, then it will quickly become unmaintainable and resource-intensive. So you will have to find the good balance between maintainability and dynamism.
Second, and corollary, you will have to define the good division. A poor subdivision will induce a poor dynamism. When you decouple client from providers you have to consider how often classes are changed. Bundles are coupled by their packages and classes. If a bundle depends on a package or a class that is changed at runtime, then the bundle will have to be restarted to take the modification into account.
A good practice is to always separate the interface from the client and from the providers. In that purpose, we will use (at least) three bundles :
- one bundle containing the service interface. This bundle will be the most stable as the service interface should not change too much.
- one or two bundle containing the providers.
- one bundle containing the client.
This way we will be able to change each bundle without restarting the whole application (so as to add new providers for instance).
There is a balance to be found between over-dividing your applications and loosing dynamism. In this tutorial, the division is acceptable as the resulting application is made of only three bundles. For more complex application, we would probably regroup some classes.
The specification bundle
Implement the bundle :
The first bundle will only contains the service interface for the reason explains above. The interface is less likely to change but is used by both clients and providers. It is a good idea to separate it from them.
Create a new project called “hello.service” and then add the interface :
package org.example.hello.service;

public interface Hello {
    /**
    * The property lang defines the language used by the service.
    **/
    public static final String PROP_LANG = "lang";

    void sayHello(String name);
}
Pay attention to the package name (org.example.hello.service). You will have to import it inside the other bundles.
Configuration : Export the package
You need to export the package containing your code. This will allow the other bundles to import and use it. In that purpose, you will have to edit the MANIFEST of your bundle. The MANIFEST contains bundle metadata such as its name or its version.
Open the file “META-INF/MANIFEST.MF” using the “Manifest Editor” (default editor).Three tab are interesting for you :
- the overview tab allows to configure the main information (name, vendor name, etc …).
- the dependency tab is provided to configure the bundle imported packages (we will use this later).
- the runtime tab gives access to the “import package” configuration.
Go to the runtime tab and click add next to “Export Packages” as shown below :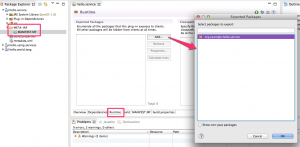
Then select the “org.example.hello.service” package. Eventually, your configuration will look like this :
Deployment
You do not need to create any components. Deploy your project using the IDE.
You can check that the deployment has been successful using the web console. If you search carefully, you will see that the “org.example.hello.service” package is exported by the bundle :
The english provider bundle
This steps are appromatively the same than when you learned how to use and provide services.
First, create a new iPOJO project called “hello.english.provider”.
Import the service package
You will need to import the package before using it. We will do that first.
Go and edit the “META-INF/MANIFEST.MF” files. Open the “Runtime” tab and in the “Imported Packages” click add.
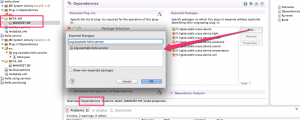
Then import the “org.example.hello.service” package and save.
If you don’t find the package in the list, you probably did not deploy the specification bundle. Also check that the package is exported.
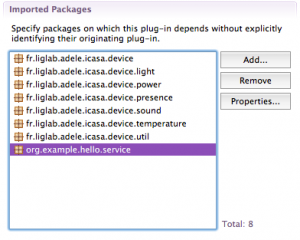 Now you will be able to use the package in your bundle.
Component configuration
The component configuration is exactly the same than from the previous tutorial. Just follow the same steps.

The implementation class is the same :
package org.example.hello.service.impl;

import org.example.hello.service.Hello;

public class HelloProviderImpl implements Hello {

    @Override
    public void sayHello(String name) {
        System.out.println("Hello "+name);
    }

    /** Component Lifecycle Method */
    public void stop() {
        System.out.println("The english hello service is stopping");
    }

    /** Component Lifecycle Method */
    public void start() {
        System.out.println("The english hello service is starting");
    }

}
If you copy the code from your previous project, make sure that you set-up the implementation class properly :
![]() Make sure that you have created at least an instance and deploy.
Make sure that you have created at least an instance and deploy.
The client bundle
The process for building the client bundle is the same.
Create a new project “hello.client”.
Import the package by using the MANIFEST.MF editor. Go to the “Dependency” tab. Then select and add the “org.example.hello.service” package in the exported Package :
 Create the HelloClient component and add a dependency to the Hello service.
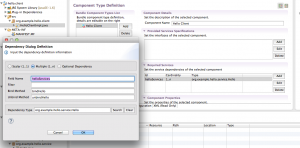 Make sure, you add start and stop method as “Component Lifecycle callbacks”.
The code is the same as before :
package org.example.hello.client;

import org.example.hello.service.Hello;
import java.util.Map;

public class HelloClientImpl implements Runnable {

    /** Field for helloServices dependency */
    private Hello[] helloServices;

    /** Bind Method for null dependency */
    public void bindHello(Hello hello, Map properties) {
        System.out.println("New Provider language = " + properties.get(Hello.PROP_LANG));
    }

    /** Unbind Method for null dependency */
    public void unbindHello(Hello hello, Map properties) {
        System.out.println("Provider leaving language = "
                + properties.get(Hello.PROP_LANG));
    }

    private void askProvidersToSayHello() {
        for (int i = 0; i < helloServices.length; i++) {
            helloServices[i].sayHello("client");
        }
    }

    /**
     * When m_end is false and the component is started, the component ask
     * providers to say hello on a regular basis. When m_end is true, the thread
     * is stopped
     */
    private boolean m_end = false;

    /** Component Lifecycle Method */
    public void start() {
        Thread t = new Thread(this);
        m_end = false;
        t.start();
    }

    /** Component Lifecycle Method */
    public void stop() {
        m_end = true;
    }

    @Override
    public void run() {
        try {
            while (!m_end) {
                askProvidersToSayHello();
                Thread.sleep(1000);
            }
        } catch (InterruptedException e) {
            stop();
        }
    }

}
You can copy the class from the previous tutorial but make sure to select the implementation class in the “Component Type Implementation” panel.
Test
Deploy your project Client and check the result on the console. The result will be :
New Provider language = en
Hello Client Starting
Hello client
Hello client
Practice : the French provider
Do the same for the French provider and reproduce the results from the previous tutorial.
Try to deploy your components after the client has been started. Hopefully, you will get this result :
New Provider language = en
Hello Client Starting
Hello client
Hello client //...
New Provider language = fr
Hello client
Bonjour client
Hello client
Bonjour client
Conclusion
These firsts tutorial have shown you the basics to start pervasive application on OSGi. In the following tutorials, we will see how to play with devices and the iCASA simulator.