Pervasive Computing in Practice
Installing your working environment
The purpose of this section is to explain how to download the tools and set them up. Specifically, you need to :
- configure your Java environment (JDK8).
- download the runtime (OSGI/iPOJO + iCasa server).
- download and install the provided IDE (Eclipse).
Configure your Java Environment
Regardless of your operating system, you need to install a Java virtual machine (JVM)
Java 8 or greater is required.
For instance, you may download and install Oracle JDK 8 or OpenJDK 8.
After the JDK installation, you have to set the JAVA_HOME environment variable to point to the JDK installation directory. This depends on your operating system.
Download and configure the iCASA runtime
Download the runtime
Download and unzip the iCASA runtime teaching distribution (Select the iCasa Teaching Distribution). You can rename the directory if you want.
iCASA runtime is a customized felix distribution. To start the framework, use the start scripts. See the introduction to felix to learn more on felix.
You can have and use as many iCASA distributions as you want. You only need to rename the directory. However, you should not run two instance of iCASA at the same time on the same computer. There will be network conflicts otherwise.
How to run iCASA gateway ?
Go to the root of your iCASA runtime directory.
Run the startGateway script (.sh on UNIX, .bat on WINDOWS).
How to run the Web Server Part ?
Even if the gateway does not need the GUI part to run, we strongly advise you to use the GUI to get a feedback from the simulator.
Go to the root of your iCASA runtime directory.
Execute startGateway.sh script on Unix systems or startGateway.bat script on Windows systems.
By default, the web server port is set to 9000. The simulator home page is available at http://localhost:9000/simulator using your browser (Firefox is strongly recommanded).
Install the iCASA IDE (Integrated Development Environment)
Installation
iCASA IDE is based on Eclipse, augmented with a number of specific plugins.
iCASA IDE requires Eclipse Juno (4.2.1) or greater version.
Eclipse Juno Windows 64 bit
Eclipse Juno Linux 64 bit
Eclipse Juno Mac Cocoa 64 bit
This is how to install the plugins:
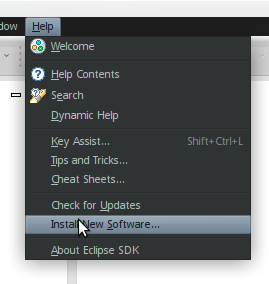
- Run Eclipse and select Help > Install New Software… from the main menu.

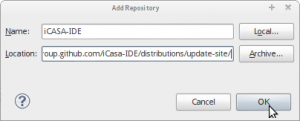
- Click on Add Button and enter a name for the update site (i.e. iCasa Update Site), then enter the update site location http://adeleresearchgroup.github.com/iCasa-IDE/distributions/update-site/, finally click on OK button.

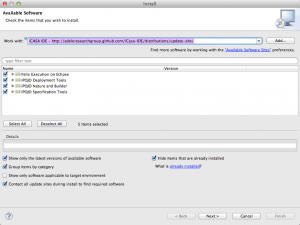
- After a few seconds, the content of the update site is displayed. Select the new update site.
- Select all features shown in the list.

- Continue the standard installation procedure and restart your Eclipse to apply changes.
If you are behind proxies, you may need to configure your Eclipse network configuration before installing.
Configuration
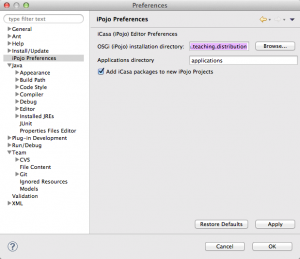
- Run iCASA-IDE and select Window > Preferences … from the main menu and go to iPojo preferences section.
- Click on Browse button and sets the iCASA runtime root directory (the directory where you unzipped iCASA)
- Check “Add iCasa packages …”.

- Finally, Click on OK button
The configuration is associated to one workspace.
If you use different distribution of iCASA (or the same version but in different directories), you will have to reconfigure your workspace and restart Eclipse.