Pervasive Computing in Practice
Your first component with the IDE
The purpose of this page is to provide a quick introduction to the IDE and start practicing. In this first tutorial, you will learn how to create a first “Hello World” component using iPOJO-IDE.
A basic Hello World
In this simple tutorial, we will have one bundle containing one iPOJO component. The project is very basic and we will not use service in this first attempt. The goal is to show how to create an iPOJO component and how to react to lifecycle events : react to the starting and stopping of the bundle.
Project Creation
Install the iCASA ide and configure it as explain in the download section. We will use first-runtime as our runtime directory (the same runtime than before).
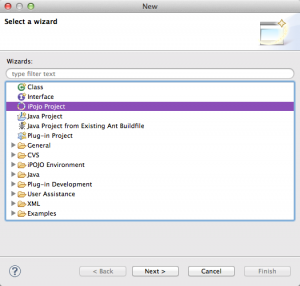
Open the project wizard and create a new iPOJO project as shown on the picture below :
Enter “hello.world” as the name of the project. Then click next and finish.
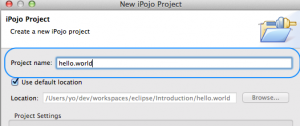
Each project corresponds to a bundle. So your hello.world project will be packaged as a hello.world.jar bundle.
Component type definition
Once created, the IDE will open the “iPOJO metadata Editor”. You can also access the metadata editor by double-clicking on the metadata.xml file.
Now let’s create the component. The Hello World bundle will only contains one components. The first tab is the “Component type definition tab”.
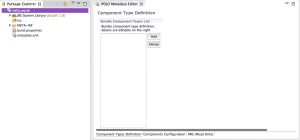
A component type is a declaration of a component, its dependencies, its properties and the service it provides. A component type is associated with one unique implementation class. This can be compared to classes in the Object Oriented Programming. Like a class, a component type can be instantiated many times with different configuration.
For a component type you often have many component instances. For each component instance, there is a implementation class instance. Instances have different variables and different configurations.
In the metadata editor click add and name your component. Let’s call it “HelloWorld”. Click on the component newComponent and in the component details enter “HelloWorld” as Component Name then save (ctrl+s).

Our component will have no properties, nor dependencies (We will explain that part when introducing services) but we will declare lifecycle method. These method are called when the component is validate or invalidate. To put it simple :
- the validate method is called when the component dependencies are ok and the component instance start.
- the invalidate method is called when the component instance dependencies are not ok anymore or if the bundle is stopped.
As we have no service dependencies, validate(invalidate) is called when the bundle is started(stopped).
Put “start” in the validate field and “stop” in the invalidate field.
![]()
One advantage of using the IDE is that it can generate a skeleton of the class based on the component declaration. To do so right-click on the component and then click “Generate implementation class” :
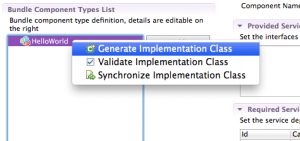
During the generation don’t forget to give the class a package. We will use org.example.hello.

Hopefully, the generator will generate this simple skeleton :
package org.example.hello;

import java.util.Map;

public class HelloWorldImpl {

    /** Component Lifecycle Method */
    public void stop(){
    // TODO: Add your implementation code here
    }

    /** Component Lifecycle Method */
    public void start(){
    // TODO: Add your implementation code here
    }
}
You have your two methods stop and start that you have declared as lifecycle methods.
The next step is to do something when the component is started and something when it is stopped.
We suggest to put a greeting message. Change the code to the following :
/** Component Lifecycle Method */
public void stop(){
       System.out.println("Good bye World !");
}

/** Component Lifecycle Method */
public void start(){
       System.out.println("Hello World !");
}
This will print “Hello world !” each time the component is started and “Good bye World !” each time it is stopped.
Instance declaration
As we explained, the component type is just the declaration and implementation of the component. To use it, you need to instantiate it.
Go to the “Component Configuration” tab and right-click on the “HelloWorld” component type. Then click on “New instance declaration”.
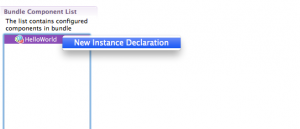
We did not declare any property for our components. The only available property is the component name.
Change the name to “Hello” and save.

Our work is now done. The instance of the component will be created when the bundle is started.
Deployment
Make sure your iCasa runtime is started as explained in the previous section.
To test your work, right-click on the project and select “iCASA Bundle Deployment” in the iCASA submenu.
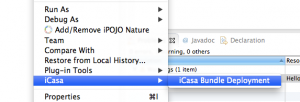
You can now check that the bundle is installed by using the webconsole.
![]()
Now go to the terminal and check that your bundle has been deployed on the platform and started. You should have a greeting :
Hello World !
Try to start and stop your components to see the alternate greetings :
Hello World !
Good bye World !
Hello World !
Creating a new instance
Go to the “Component Configuration” tab and right-click on the “HelloWorld” component type. Then click on “New instance declaration” and add a second instance “Hello2”.
Deploy your bundle again and check that you have two greetings :
Hello World !
Hello World !
There is one greeting by instance.
If you stop your bundle you will also have two greetings :
Good bye World !
Good bye World !
Conclusion
In this section, you have learned what a iPOJO component is and how to write your first bundle.
What you should remember is that iPOJO components and bundle are complementary. Bundles deal with how to hide and share the code and components deal with how to instantiate and use the functionalities.
In the next section, you will learn how to add properties to components and how to configure the instances.